Nothing is for sale here. Freewill tips keep the site running. Want to help? → Tip via Paypal
Font Family
While you can change the font on your web page to any font you choose, but there is a caveat to that—the computer used to view the page must have the font you name installed to display your text in that type face.
So, while you can name any font you like, if you want others to see the font you name you’re limited to the fonts commonly found on the majority of computers unless you use web fonts or Google fonts. More on that down the page.
When naming a font, you can choose specific fonts by name such as Arial, Verdana, or Garamond; or you can set a generic font family. Your best bet is to name a specific font or fonts and set a generic font family in case none of the fonts you name are installed.
Here’s an example of how to set a font by name:
With that in your style sheet, Verdana will be the font used on your page instead of Times New Roman. Note that if the name of the font is capitalized, you should capitalize it in your code. Most font names are capitalized but not all. You can also set more than one font:
Each font name should be separated by a comma. If a font name has a space in it, then the name should be enclosed in quotation marks as I show for "Lucida Console' in the above code example.
This may leave you wondering how to code a font like Gill Sans using an inline style since an inline style already has quote marks. In that case, use the single quotation marks around the font name. Example:
In the inline code example, the viewing computer will display your page in the Verdana font if it’s installed. If Verdana is not installed (it almost always is) then it will display your page in the Gill Sans font. If Gill Sans is not installed it will display your page in the Moonbeam font. If none of the fonts named are installed it reverts back to the default font.
As I previously mentioned, you can also name generic font families. By naming a generic font family, the computer chooses the font to use from within that font family. The generic font families are:
cursive | fantasy | monospace | sans-serif | serif
If a picture is really worth a thousand words, the image below should give you a better idea of what those font families look like than you’d get with me trying to describe them to you.
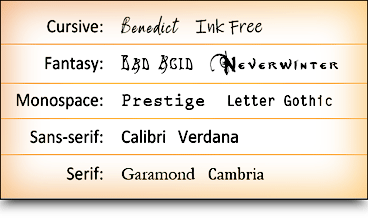
Be aware that there are thousands of fonts in each font family. There can be drastic differences between the various fonts within the same family, especially in the fantasy and cursive families, as the font samples in the image clearly shows.
You never know which font the viewing computer will pick for the generic font family, so these should only be used as the last entry to maintain as much control over your design as possible.
To name a generic font family as a backup to your specific fonts, it’s written the same as you would for naming a specific font only you use the generic font family name instead. Here’s an example of that:
In that example, if the Verdana, Tahoma, or Lucida Sans fonts are not installed, the computer will select a sans-serif font from the fonts available on the viewing device. As you've probably gathered by now, the results can be unpredictable.
You can apply font family style rules to any element that accepts text, such as: paragraphs, divisions, headings, etc. Note that the correct syntax is to hyphenate font-family. Also note that, while the names of the fonts are usually capitalized, the generic font family types are written in lower case.
Web Fonts
Web fonts are specifically designed and optimized for use on websites. They allow web designers use fonts that aren't available on users' devices.While there are web fonts you an download and upload to your site, it's beyond the intent of this tutorial to write a guide in where to find them and how to use them. Therefore, we'll focus on using Google Fonts. Google Fonts is a collection of over 1,500 web fonts. You can preview each font, set the site, and set the text it previews.
With Google Fonts, you don't even have to download them and upload them to your web space. You can grab a link right there, paste it into the HEAD section of your page, and use the font on your site with confidence your visitors will see the same font. It really couldn't be simpler once you learn your way around the Google Fonts website.
How to Use Google Fonts
- Go to the Google Fonts website.
- Type the text you want to see displayed. This will eliminate the fonts displayed in other languages that are showing when the page first loads.
- You can set the font size using the slider. Options include font categories, language (English isn't listed, it's the default), number of styles (leave it at the default to see just one style of each font—when you click a font you'll see all the styles), show only variable fonts, and show color fonts.
- Scroll the page until you find something like, or use the search function. When you see one you like click it.
- If you want to use that font, click the circled "plus" sign to add it to your list.
- After you've selected one or more fonts, click the icon in the upper right corner (three gray squares and a plus sign—there should be a red dot with it if you have any fonts selected).
- That will open a side panel where you can scroll down and copy the code to paste into your page.
That's it. Happy fonting!