Nothing is for sale here. Freewill tips keep the site running. Want to help? → Tip via Paypal
Clip an Image
The clip property is similar to the overflow property in that it let’s you display content in an element that is smaller than the actual content. The difference is that clipped content (usually an image) cannot be viewed via scrolling; it is truncated at the dimensions you choose so it remains hidden from view.
Hey, I’ve got an idea. Let’s clip my wife!
 Oh look . . . there’s a photo of her now, standing in front of a giant rock.
That’s right, men—I have a lovely wife and I know where to find big rocks.
Don't be jealous.

Anyway, let’s say I want to clip the photo so I have a head and shoulders shot of her instead of the full photo. Normally I’d crop the image in a graphics editor to achieve that result, but not everyone knows how to do that. So instead, we’re going do some CSS clipping.
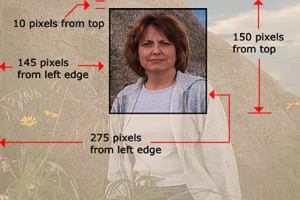 The graphic to the right shows how I want to clip the photo. Clipping an object starts at the top and works clockwise around the image. The horizontal clipping lines are measured from the top edge of the object to be clipped, and the vertical clipping lines are measured from the left edge of the object .
At the top I want 10 pixels clipped off the image. From there we work clockwise around the image. As I show in the graphic, I want the right side clipped at 275 pixels from the left edge. The bottom is to be clipped at 150 pixels from the top. The left side is to be clipped at 145 pixels from the left side. These numbers are our clipping coordinates. These coordinates are used to tell the browser where to clip the object you want to clip, Chip.
There are three ways to determine the coordinates. The first way is to use a graphics program and take measurements. Since there are so many different graphics programs, and no matter which one I choose most people won’t have it, so we’ll skip this method.
The second way is to just guess. You enter the coordinates into your style code, open it in your browser and see what it looks like. From there you can adjust your coordinates until you get it like you want it.
The third way of determining the coordinates is to trick the Internet Explorer browser into thinking the image is an image map. When the browser thinks the photograph is an image map, the cursor becomes a hand pointer as you place it on the image, and then the key to the whole thing is that along with showing the pointer, the status bar of the browser will reveal the exact coordinates where the pointer is pointing.
By placing the pointer where you want the top clipping line to be you’ll easily have your first coordinate. Next move the cursor to where you want the right clipping line to be, note the coordinate, and finish the other two clipping line coordinates in the same way.
To trick the browser into treating the photograph as an image map we need to do two things. The first is to add ismap to the image tag. Here’s how to do that:
<img src="your-image.jpg" ismap>
By adding ismap to the image tag the browser thinks it’s an image map. Next, to activate the browser into showing the coordinates we have to place a link around the image:
<a href="#null">
<img src="your-image.jpg" ismap>
</a>
With that little snip surrounding the image you’re ready to determine the coordinates.
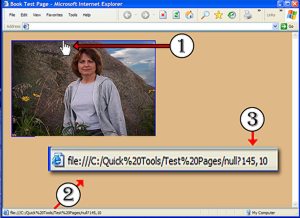 In the graphic on the right the circle labeled with the number 1 points to the spot where I placed the cursor. In turn, the image coordinates of the cursor show up in the status bar at the bottom of the browser. I’ve drawn the circle labeled with the number 2 there, and added an arrow pointing to…
…a graphic I made that shows the text in the status bar so you can see it better. The circle labeled with the number three is pointing to the image coordinates in the enlarged status bar. The first coordinate shows the how far the cursor is in from the left side of the image, and the second coordinate shows how far down the cursor is from the top of the image.
That gives me the coordinates where I want to clip the left side and top. Now all I have to do is repeat the process to find the right and bottom coordinates. If you have trouble setting the cursor where you want for two coordinates at a time, you may find it less confusing to just do one side at a time.
Clipping only works if the image is positioned using the absolute positioning scheme. Let’s position the image and add the clipping code.
</img src="your-image.jpg" width="480" height="360" alt="wife" style="position: absolute; top: 20px; left: 20px; clip: rect(10, 275, 150, 145);">
The third line of code shows the style attribute opened and the positioning of the image. Remember, only images positioned with the absolute positioning scheme can be clipped. The fourth line of code shows the clipping property and values added.
 The clip: rect part tells the browser the image clipping is in a rectangular shape. That’s the only shape there is at the time of this writing, but one might anticipate a future version might include a circle shape and perhaps even a polygon shape.
There should be no space between rect and the left parenthesis bracket. The coordinates are separated with a comma and a space.
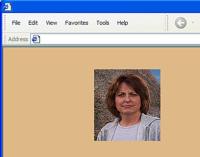
This final screen shot shows you what the clipped image looked like in my browser.
And no, I don't use Internet Explorer. It's just the only one that will show the coordinates.
 You will need to be cautious using clipping because other content can disappear beneath the image, as with any absolutely positioned element. You’ve been wormed . . . uh, warned.